Radiant Heat for Concrete Slab on Grade
As the past has demonstrated, concrete slab-on-grade floors are ideal for radiant floor heating. The number of buildings with this type of floor construction is huge. It includes a significant percentage of single family houses as well as a large percentage of commercial buildings. Some of the best radiant floor heating opportunities are in pole barns, shops, garages, basements, automotive service centers, town highway garages, fire stations and aircraft hangers. These buildings almost always have uncovered concrete floors, and benefit tremendously from the warm, dry floors that radiant hydronic floor heating can provide.
The installation of a radiant heated floor slab begins by verifying the sub grade has been properly leveled and compacted. Although the heating system installer is probably not responsible for this aspect of construction, failing to check for proper sub grade preparation could eventually compromise the embedded tubing circuits. It could also leave the installer having to defend why the floor heating system isn’t at least partly responsible for cracks in the slab or other defects.
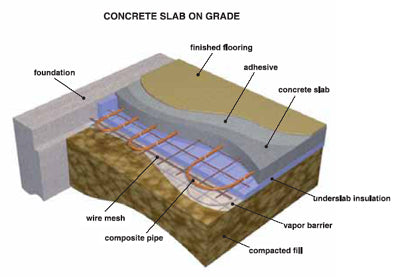
After the sub grade has been prepared, the soil vapor barrier and underslab insulation should be installed. Some building specifications may not call for an underslab vapor barrier insulation. However, its ability to resist moisture migration from the underlying soils can be indispensable, especially when wood products are used as the finish flooring.
Heat loss from the edge and underside of a heated slab on grade can be substantial, especially in areas with high water tables or where the slab rests on bedrock. Edge and underslab insulation are essential in reducing these losses. They are a necessary part of any quality floor heating system. Not taking steps to mitigate such heat loss is like leaving the windows open throughout the winter.
Realistically there’s only one opportunity to install underslab insulation—before the slab is poured. Discovering high downward heat loss after the system is in operation is a situation that’s virtually impossible to correct. It makes little sense to attempt the installation of a high quality heating system while omitting crucial and relatively low cost details. Do it right the first time.
The most commonly used material for slab edge and underside insulation is extruded polystyrene. It’s sold in 2 by 8 foot and 4 by 8 foot sheets in several thicknesses. It’s also available in several densities to handle different floor loading. Extruded polystyrene panels are highly resistant to moisture absorption, and have a well-established record in ground contact insulation applications. We recommend "The Barrier" Insulation.
The next step on most installations is to locate and temporarily mount the manifold station(s). If one more of the manifold stations will be located within stud cavity, it’s imperative to make accurate measurements when fixing the manifold’s location. The manifolds can be temporarily bracketed to plywood panel supported on wooden or steel stakes driven into the sub grade.
Once the insulation is in place, the steel reinforcement for the slab is installed. Most concrete slab on grade floors use welded wire fabric (WWF) for reinforcement and crack control. WWF comes in sheets or rolls. It should be placed directly on top of the underslab insulation. Edges should be overlapped approximately 6” and tied together.
Tubing installation takes place one circuit at a time. Begin by securing one end of the circuit to the supply manifold. Roll out the coil like rolling a “tire” following the layout pattern and tie down the radiant heat Pex to the wire mesh. Try and use all of the radiant heat Pex in the floor prior to making the manifold connection. Make sure the end reaches the manifold. Using a tubing uncoiler helps when laying the radiant heat Pex.
When using an uncoiler, pull the tubing from the coil as needed. Keep plenty of slack ahead of you as the tubing is fastened in place.
The radiant heat Pex should be secured to the WWF using either twisted wire ties or nylon pull ties. The tubing should be tied to the WWF reinforcing every 60 to 72” on straight runs, and two ties at the bend on each side.
When all circuits have been installed, prepare the manifold(s) for pressure testing.
Use an air compressor to increase the pressure in the circuits to 60-100 psi. Use a soap bubble solution to check for leaks at the manifold connections. Leave the circuits pressurized for at least 24 hours. If the air pressure drops double check all manifold connections for possible leaks before inspecting the tubing. Aside from the possibility of extreme damage from other construction activity, it’s very unlikely that the tubing is the source of the air leak. Still, a pressure test is mandatory on any radiant tubing installation. If the WWF has to be positioned in the concrete slab, be sure the concrete slab placement crew knows to lift the tubing and WWF prior to starting the pour. If the WWF has to be positioned within the slab, it has to be lifted or “chaired” up to the final position before the concrete slab is poured. The WWF and attached tubing should be lifted up so the pipe center is 2” below the slab surface. This allows the concrete slab to respond faster when warm water circulates through the tubing.